
SCPI Programing
SCPI-Generator Program (SCPI-GEN)
Overview
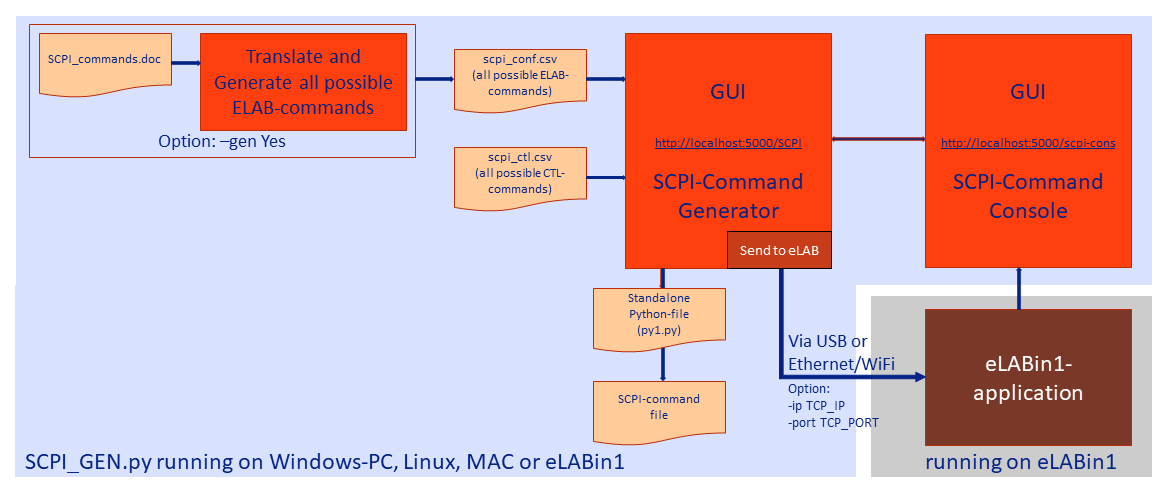
The eLABin1 is a sophisticated piece of hardware with several (up to 30) measurement instruments in one device. So programing the eLABin1 and performing measurements via SCPI using a Command Line Interface is a very tedious job as there are thousands of potential commands.
To ease this, Coffee-Electronics developed a SCPI-Generator-program (SCPI_GEN) which guides the user to the appropriate SCPI-commands. In addition we developed a simple 'control language' which alows to program eg. loops, or wait-states.
This SCPI-GEN-program can be downloaded from the company web-page https://coffee-electronics.com .
The SCPI-GEN program is written in Python3 and is running on Windows, Linux, MacOS and also directly on the eLABin1. If the program is not running direclty on the eLABin1, the communication with the eLABin1 is via TCP/IP (wired or wireless) or via USB-interface.
The program is started by Python3
SCPI_GEN.py or similar depending on the users setup and environment.
Additional Command-Line options will be explained later in the manual.
After
starting the program the user can communicate with the program via a simple WEB-gui.
The WEB-Gui can be accessed via http://localhost:5000/SCPI if
running on the same machine, or via http://'IP_Address':5000/SCPI
if running on a different machine with 'IP_Address' being
the local IP-address of the host machine.
Starting the Program
The program package 'SCPI_GEN.zip', can be downloaded from the Coffee-Electronics web-page. The zip-package contains a couple of Python-file (.py), some control-files, web-templates and others.
The program requires the installation of Python3.6 or higher on a host device (eg
Windows PC, Linux Workstation) or directly on the eLABin1 (which is not explained
here in further detail). After extracting the zip-package and installing additional
python-libraries if needed the program can be started with eg. python3
SCPI_GEN.py.
There are a couple command-line options available:
-g Yesor-gen Yes: if this option is specified the program takes a Microsoft-Word document ('SCPI-Manual.doc') as input-file parses all the tables in this file for SCPI-commands and adds them to the 'scpi_conf.csv'-file. If this option is omitted, this extraction is not performed and the existing 'scpi_conf.csv'-file is used. This option is only needed if new SCPI-commands are added or SCPI-commands are changed.-i TCP_IP -p TCP_PORTor-ip TCP_IP -port TCP_PORT: these options typically come together and specify the IP-address (eg. '192.168.1.100') and the IP-port (eg. '4000') of the eLABin1-device. This option is only needed if the connection is via TCP/IP and the program is started from an host-machine (eg Windows PC, Linux Workstation) and the communication with the eLABin1 is via an Ethernet- or WiFi-connecton. The standard port for the eLABin1 is '4000', which is also the default value for this option.
Example:
Consider the IP-address of the eLABin1 is '192.168.1.100', and port '4000' is used to
communicate with the eLAbin1: The command would be: python3 SCPI_GEN.py -i
192.168.1.100 -p 4000
WEB-GUI
After launching the SCPI_GEN-program the operation can be controlled via a WEB-GUI
which is accessible from any browser via IP-address:5000/SCPI.

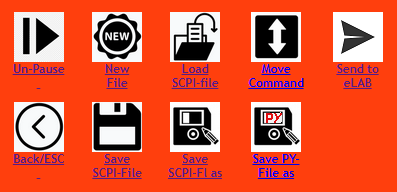
On the top-right of the screen is a Control-Field, the lower part is to enter SCPI- and CTL-commands.
| Control Panel | Button | Function | Button | Function |
|---|---|---|---|---|
 |
 |
Sends the command seqeunce to the eLABin1-application |  |
Resumes the program execution after a 'Pause'-command |
 |
Terminates the communiation with the eLABin1-application | |||
 |
Saves the current command sequence. The file can be modified with any text-editor. |  |
Saves the current command squence as specified with the file-name | |
 |
Saves the command seqeunce as a Python3-file (.py), which can run stand-alone or be included into another python-file. |  |
Loads a previously saved file with SCPI-commands. | |
 |
Obsoltes the current command(s), and start a new command seqeunce |  |
Moves the command from one to another line |
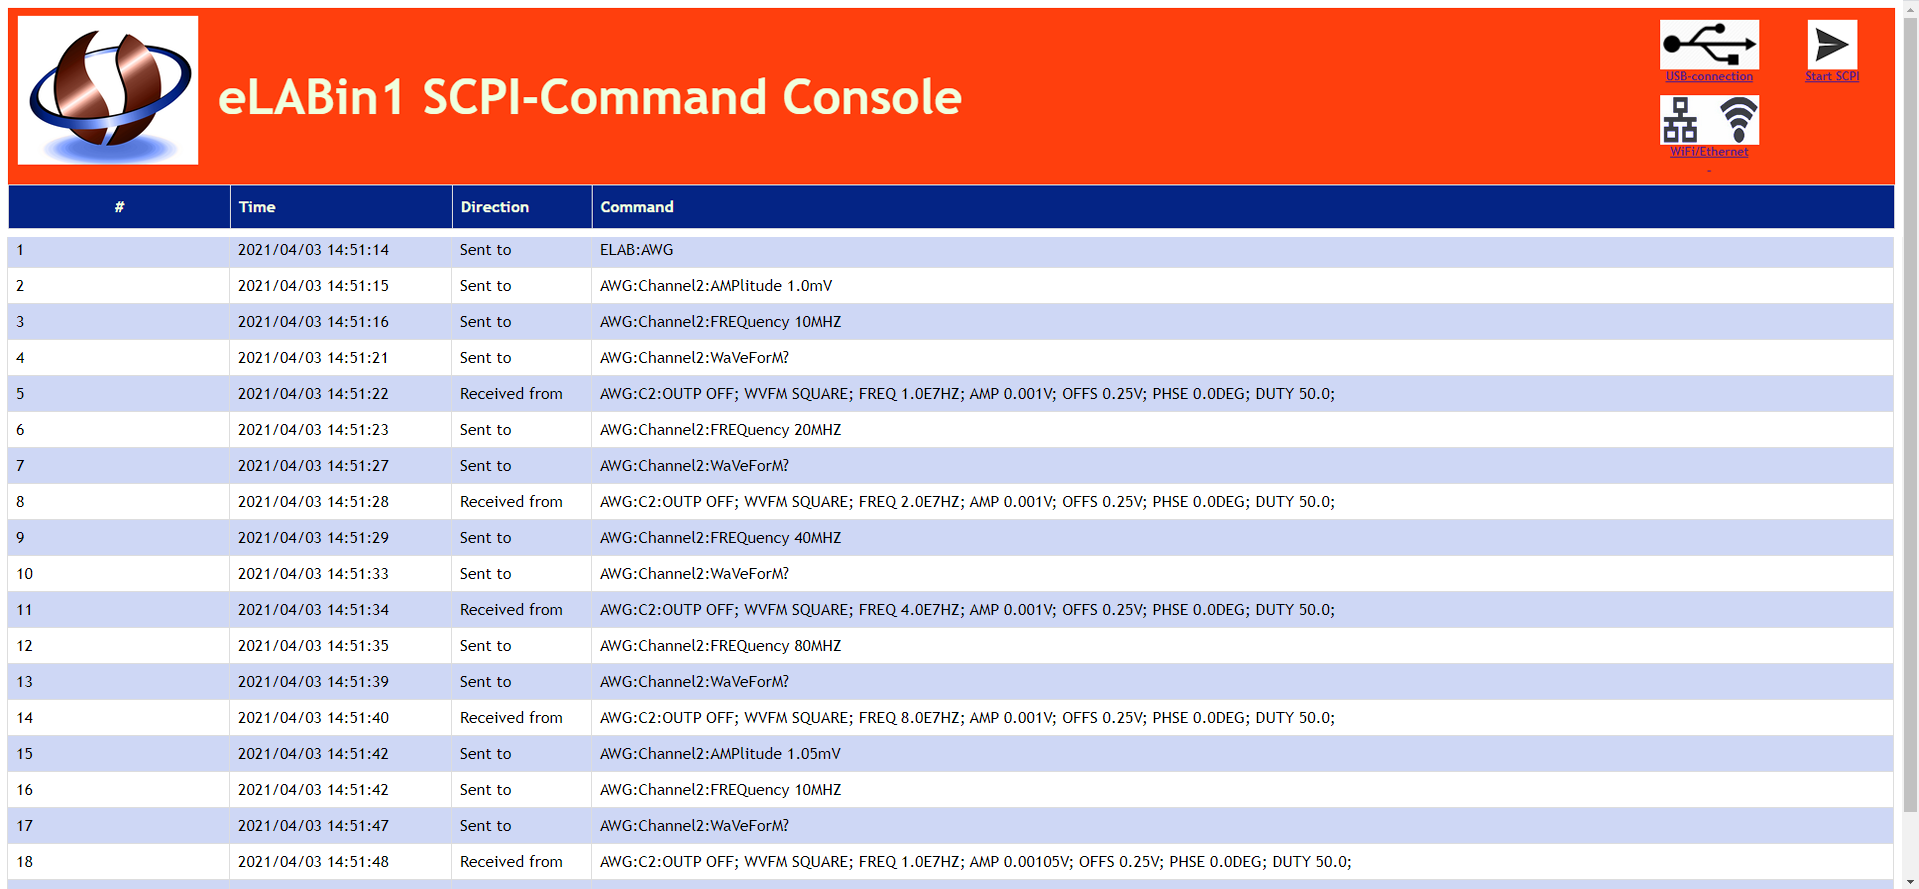
After pressing the 'Send to eLAB'-Button in the Control Field the SCPI- and CTL-commands are send to the eLABin1-application for execution.
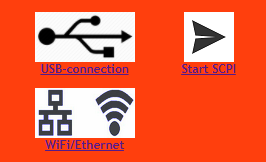
A new browser-window the SCPI-Console http://localhost:5000/scpi_cons opens up automatically, which alows to select the communication-mode with the eLABin1-device (USB or Ethernet/Wifi) and to start the actual execution.
| Console Panel | Button | Function |
|---|---|---|
 |
 |
Start the a actual tranfer of SCPI-commands |
 |
Set the communication mode to USB | |
 |
Set the communication-mode to Ethernet or WiFi, using the IP-address and IP-port specified when starting the program. |
eLAB-Commands
After starting the SCPI_GEN program the GUI can be accessed via http://localhost:5000/SCPI or remotely via http://'IP_Address':5000/SCPI with 'IP-Address' the being the local IP-Address (eg. 192.168.1.200) of the host machine running the program..
The program will guide the user by only showing the commands available at a specific point.
- At the first step the user can select between 'eLAB' which are commands for the eLABin1 instruments like Arbitray Wave Generator (AWG), or Oscilloscope (OSC) etc. and 'CTL' or Control Commands (CTL) to insert eg 'Loops' or 'Waitstates'.
- After selecting eg 'ELAB' the user is asked (among other options) to select an instrument like Arbitray Wave Generator (AWG), or Oscilloscope (OSC) etc. or other device-specific options.
- After selecting eg. 'AWG' the user is asked to select the Channel (Channel 1 … 4).
- These choices are continued until the command is complete and 'ENTER' is selected.
- In case of an error, the user can go back to the previous screen be selecting 'BACK'.
- After pressing 'ENTER' the entire command can be deleted by clicking on the command number ('#', 1st column).
- The commands can also be moved to a different position using the 'Move Command'-command.
The example below shows a complete programing sequence to set the eLABin1 AWG Channel2 to an Amplitude of 1.2mV


Control-Commands
Besides eLAB-commands (controlling the settings of the instruments) there are also have Control-commands (CTL-commands) offered by the GUI. These CTL-commands are defined in an extra configuration file 'scpi_ctl.csv'
These control commands include Labels, Loops between Labels, Parameter changed with each loop and WAIT (time/for input).
- Labels: are named markers ('Label-1', Label-2'..) which are used to mark the begin or end of a loop
- Loops: the code between 2 labels is repeated (looped) for a defined
number of times (eg. for loop-counter = 1 to 10:) This example would repeat all the SCPI-commands between the 2 labels 10 times.
which is not useful by itself - here Parameters come in:Label-1 ELAB AWG Channe12 FREQency 2 MHz ELAB AWG Channel2 Amplitude 0.5 V ELAB AWG Channel2 WafeForm? CTL:PauSE:Time 10sec Label-2 CTL:LooP-1:Start:Label-1:End:Label-2:NLoops 10 - Parameters: alow to 'parametize' values ie. treat values as variables
which are changed automatically with each loop
Parameters can be entered using the term 'Para-1' ... 'Para-10' either by writing instead of a number, or by selecting 'Para-1' ... 'Para-10' from the GUI.
Example: by replaceing
ELAB AWG Channel2 Amplitude 0.5 VwithELAB AWG Channel2 Amplitude ‘Para-1’ Vthe Amplitude becomes a parameter.It is possible to set the Start-Value and an Increment-Value which is controlled by the loop-counter (eg StartValue: 1V, Increment-value 0.1V). The amplitude will change according to
start-value + loop_cnt * increment-valueso it becomes 1.0V, 1.1V , 1.2V, …..In addition an Increment-Factor can be used to control eg. Frequencies.
Example: by replaceing
ELAB AWG Channel2 Frequency 10 MHzwithELAB AWG Channel2 Frequency ‘Para-2’ MHzthe frequency becomes a parameter.It is possible to set the Start-Value and an Increment-Factor which is controlled by the loop-counter (eg StartValue: 10Mhz, the increment-factor: 2). The frequency will change according to
start-value * increment-factor **loop_cntso it becomes 10MHz, 20MHz, 40MHz …. - Pause: by inserting a ‘Pause’-command, the program is asked to wait for a specific amount of 'Time' (eg 10sec) before the operation is resumed, or 'Wait for_Enter’ when the program waits until the 'Un-Pause'-Button is pressed.
- ESC/Back: the execution of the program can be terminated with the ‘ESC/Back/-button from the GUI.
- The program currently supports 10 Labels ( 'Label-1' ... 'Label-10'), 5 Loops ('Loop-1' ... 'Loop-5') and 5 Parameters ('Para-1' ... 'Para-5'). The names of the Labels, Loops and Parameters are fixed.
Complete Example for controlling the AWG (implemented in ‘actl.tst’)
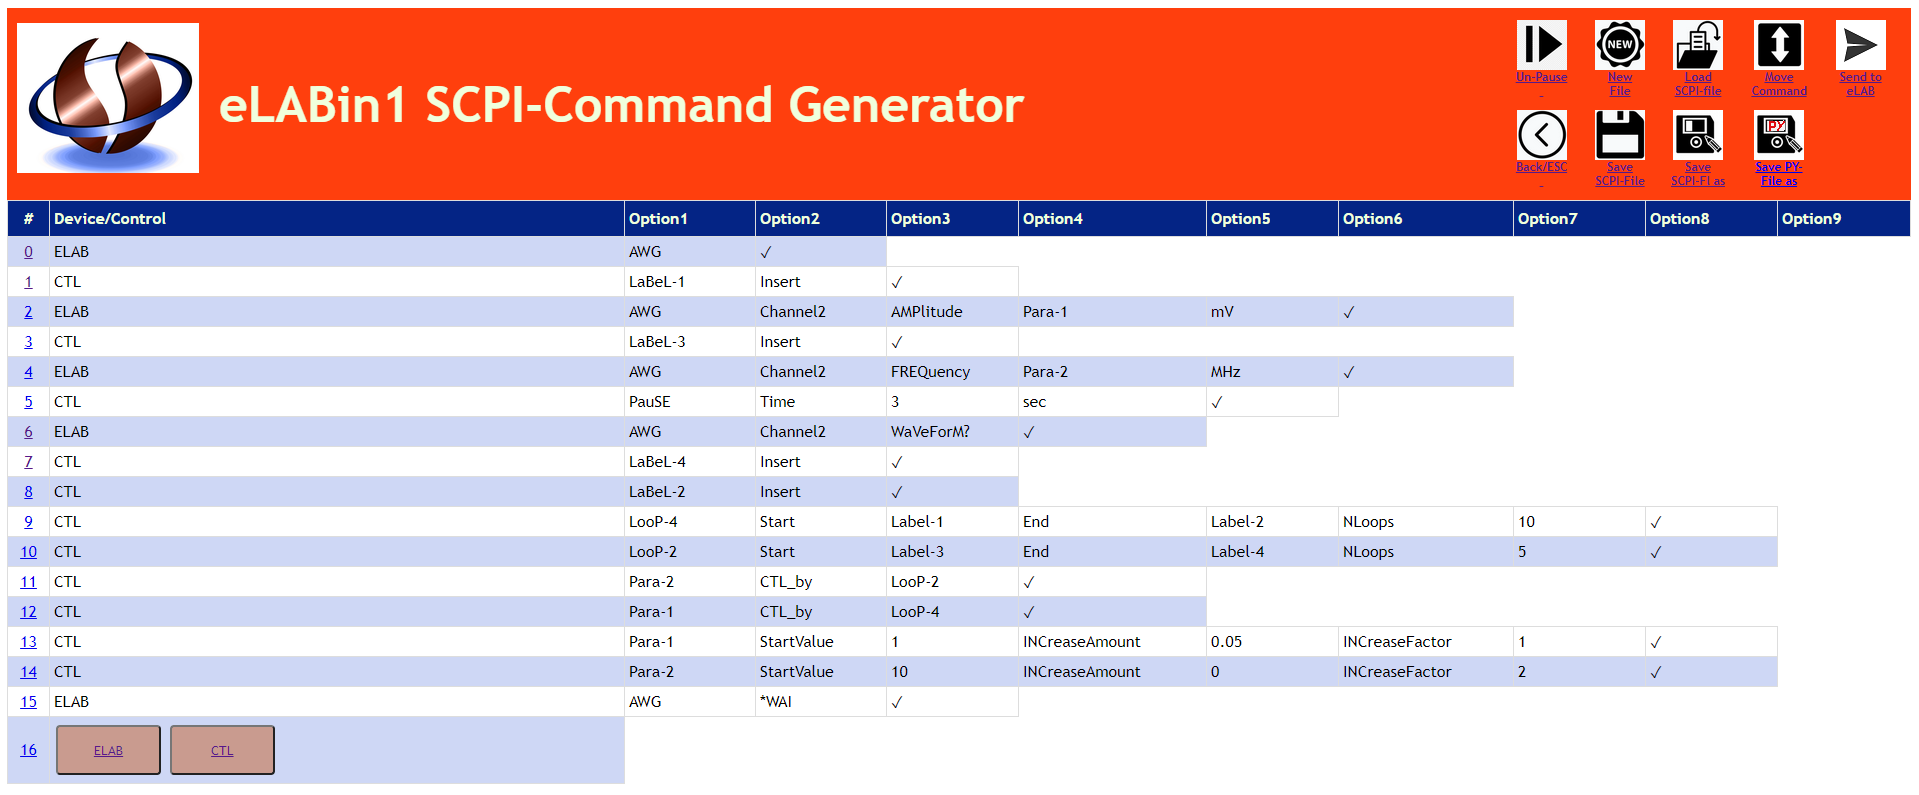
ELAB- and CTL-commands with some explaination:
ELAB:AWG
CTL:LaBeL-1 Insert                                           ||Insert LABEL-1
   ELAB:AWG:Channel2:AMPlitude:Para-1 mV                     ||Amplitude is made a variable Para-1
   CTL:LaBeL-3 Insert                                        ||Insert Label-3
      ELAB:AWG:Channel2:FREQuency:Para-2 MHz                 ||Frequency is made a varable Para-2
      CTL:PauSE:Time 3sec                                    ||Pause for 3 sec
      ELAB:AWG:Channel2:WaVeForM?                            ||Query for Waveform
      CTL:LaBeL-4 Insert                                     ||Insert Label-4
   CTL:LaBeL-2 Insert                                        ||Insert Label-2
CTL:LooP-:Start:Label-1:End:Label-2:NLoops 10                ||Loop-4: between Label-1 and Label-2, 10x
CTL:LooP-2:Start:Label-3:End:Label-4:NLoops 5                ||Loop-2: between Label-3 and Label-4, 5x
CTL:Para-2:CTL_by LooP-2                                     ||Para-2 is controlled LooP-2
CTL:Para-1:CTL_by LooP-4                                     ||Para-1 is controlled LooP-4
CTL:Para-1:StartValue:1:INCreaseAmount:0.05:INCreaseFactor 1 ||Para-1 for Amplitude: 1 + i*0.05
CTL:Para-2:StartValue:10:INCreaseAmount:0:INCreaseFactor 2   ||Para-2 for Frequency: 1* 2**
ELAB:AWG *WAI                                                ||Wait until finished